
In this blog we’re going to look at how to go about calibrating a monitor using colour bars.
There are various reasons as to why it’s important to have a calibrated monitor in production - most importantly though, it ensures we are making judgements based on the correct image. Luckily, calibrating a monitor is fairly straight forward once you know, so let’s get started!
There are various reasons as to why it’s important to have a calibrated monitor in production - most importantly though, it ensures we are making judgements based on the correct image. Luckily, calibrating a monitor is fairly straight forward once you know, so let’s get started!
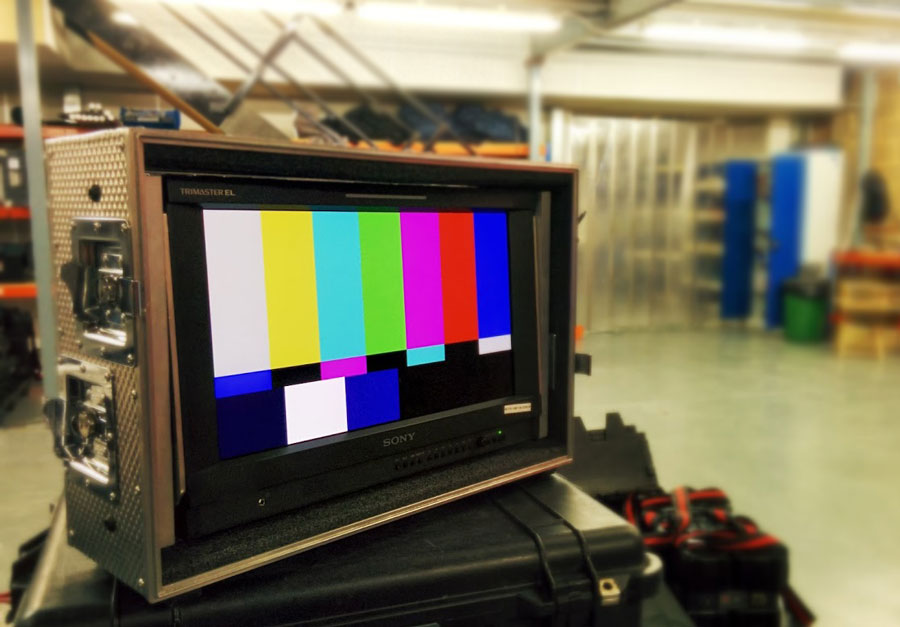
| 1. 2. | Firstly, we need to get the correct colour bars displayed on the screen. Unfortunately this isn’t as simple as finding a regular photo from the internet to output to the monitor, it needs to come from a guaranteed source. This can be in the form of many cameras which have colour bar output options, as well as colour bar generators and NLE’s (non linear editor’s). The most commonly used colour bars for calibrating is SMTPE; which is what we’ll be using here. Note that you would technically need to recalibrate your monitor for every source. Calibrating with one camera and switching to another is not generally sufficient. Once the colour bars are displayed we can start calibrating. It is recommended that you reset the monitor to default settings first, or if no option exists, manually move the controls back to their starting positions. After that, there’s a few steps to perform to fully calibrate the monitor. Typically, the first is to set our brightness. To do this we are looking at the three thin black bars just beneath the red bar (for those interested, these are known as Plunge bars, Picture Lineup Generating Equipment. They give us brightness levels of 3.5, 7.5 and 11.5 IRE from left to right). The aim here is to adjust the brightness so that the two left hand bars merge into one whilst the right hand bar is just distinguishable. It can be easier to judge this by turning off Chroma (saturation/colour) on this display. |


| 
| 
|
| 3. | Now we have our brightness set, we can move onto contrast. Contrast and brightness are closely linked in terms of impact to the image - adjusting one will affect the other, so you may need to go back and forth between the two to get it perfect. To set the contrast correctly, we’re now looking at the white square toward the bottom left. This square represents pure white - the aim with this is to adjust the contrast until this white no longer seems to change. Often around the 70-80% mark, a point will appear where pushing further has little effect. On top of this, you want to make sure there’s no white ‘spill’ leaking over into areas. Having set this, check the Purge bars again to make sure they still appear correct, if not make adjustments to brightness and contrast until a balance is found. |

| 4. | The final step is to adjust the chroma & hue. To do this we need to set the monitor to only display monochrome or ‘blue only’ (just the blue channel). If your monitor doesn’t have this function you can attempt to get a blue gel (Full CTB/Lee 47B) and hold it front of your eyes. Assuming you’re using the monitor function (though it works the same either way) you should have a greyscale or black and blue image. The aim here is to adjust the chroma until the outer blue and grey bars merge together and adjust the hue until the cyan and magenta bars merge together. |


And that’s it! One fully calibrated monitor ready to go! If you're struggling getting matches by the end of the process, stop, reset and try again. You may find things faster (especially on a monitor with physical dials) to go to extremes then back and again to fine tune. It may also be that your monitor (perfectly possible if using a non professional monitor grade display) is not capable of representing accurate colour.
 RSS Feed